
Here is a quickee tutorial for you all!
STORY TIME: Have you seen the DIY Stamp tutorial on pintrest? I have and I placed the craft on my Todo list. Now I have finally found the time to try it out. Below I will show you the steps needed to recreate this neat craft.
PROCEDURE:
Step 1. Gather materials.

Materials needed:
There are basically no out of the ordinary materials needed for this stamp. My parents brought home some Chinese take-out, so before they threw away the boxes, I cut out the top flat part. You will need to look for those styrofoam containers. The flat parts (not the sides of the container) make the ideal stamping material.
Styrofoam (cut into any size/shape you want, but I suggest starting small)
Dull pencil (I stress the importance of dull, do not try to make this stamp too detailed)
Permanent marker
Paper
Paint (I chose acrylic, but you can easily use fabric paint if you choose to stamp on fabrics!)
Paint brush
Step 2. (1/4) Sketch the stamp design (the lines you make will show up as empty space in the print)
Step 3. (2/4) Go over design with permanent marker.
Step 4. (3/4) Flip sketch over (this is important if your stamp has letters) and tape to the styrofoam piece
Step 5. (4/4) Use the dull pencil to make an impression into the styrofoam using the sketch as a template. Pull off the sketch, and then push the pencil into the stamp further
Then your stamp is finished!

Step 6. Prepare the surface to be stamped
Step 7. Spread a thick layer of paint on to a palette, like a plate.
 |
| I used a piece of acetate to spread the paint |
Step 8. Make good contact with the face of the stamp with the paint. You may need to rub the back side of the stamp. When you pick up the stamp again, check that it is fully covered. If it is not, just re-dip the stamp!
Step 9. Make good contact with your surface and stamp. Push down and rub carefully to ensure a good print.
**You may get better results if you use a rubber hand roller, but it is not really necessary, just practice a few times on scrap paper
TA DA! Cute prints!
 |
| Top: Neat print on an envelope Bottom: Resulting stamp made from styrofoam |
CONCLUSION:
I made a few adjustments to the paint palette from step 7. You can see my results below.
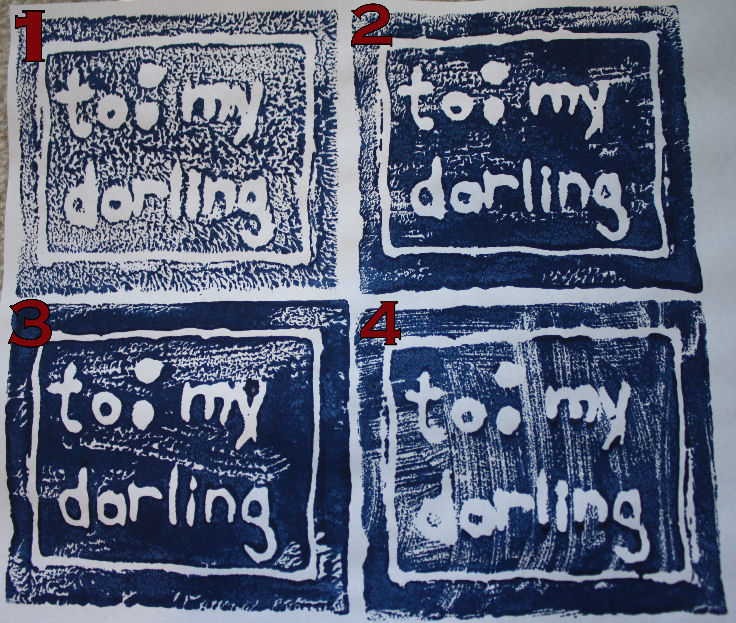
Print 1: I used a thin layer of paint
Print 2: I used a thicker layer of paint
Print 3: I used a THICKER layer of paint
Print 4: Instead of using the palette, I painted onto the stamp directly.
Your results will be different so you'll need to practice!
And a quick note:
Steps 2 through 4 are only necessary if you wish to stamp letters or words. If you can free hand it, go right ahead! I free handed the stamp at the top of the tutorial with the wood grain.
That's it folks!
Happy stamping!
_Lisa Nguyen
No comments:
Post a Comment